When you reach Town Hall 15, the game changes. You’re no longer playing casual Clash of Clans, you’re commanding a high-tech fortress that can make or break your clan’s war streak. A TH15 war base with the Eagle Artillery placed in the center is one of the most effective defensive strategies in the current meta. Why? Because at this level, attack strategies are more advanced than ever, and centralized defense gives you the upper hand.
This guide dives deep into TH15 war base layouts, explains why the Eagle Artillery deserves the core spot, and breaks down how to design, tweak, and defend your base against every type of attack from Queen Charges to Electro Titans. Let’s get started.
Table of Contents
🏰 What Makes a TH15 War Base So Unique?
By the time you hit Town Hall 15, you’ve unlocked an impressive array of defenses:
- Monolith, the heavy single-target beast.
- Spell Towers, customizable with Rage, Poison, or Invisibility.
- Upgraded Inferno Towers, now dealing even more DPS.
- And of course, the Eagle Artillery, a signature powerhouse that can rain devastation from the skies.
Unlike earlier levels, a TH15 war base isn’t about clutter or confusion; it’s about calculated chaos. Every wall, trap, and defensive structure has to work in perfect harmony. A single misplacement can turn your “unbreakable” base into a 3-star victim.
🎯 Why the Eagle Artillery Belongs in the Center
The Eagle Artillery has been one of the most decisive defenses since its introduction. But at Town Hall 15, with offensive troops being stronger and more varied, where you place it determines whether your base stands tall or crumbles.
1. Central Protection
The Eagle Artillery has a long firing range but limited HP compared to the Monolith or Town Hall. If placed near the edge, a skilled attacker can snipe it early using a Queen Walk, Balloon, or even a Blimp. Center placement ensures:
- It’s protected from early snipes.
- It keeps firing deep into the attack phase.
- It synergizes with the Monolith and Infernos for layered defense.
2. Psychological Pressure
Attackers often plan their entry points around Eagle Artillery placement. A centralized Eagle makes it difficult for them to reach it quickly, forcing them into traps, seeking air mines, or high DPS zones.
3. Balanced Damage Coverage
With the Eagle firing from the middle, every part of your base remains within range. Whether the attacker comes from north, south, east, or west the artillery strikes relentlessly.
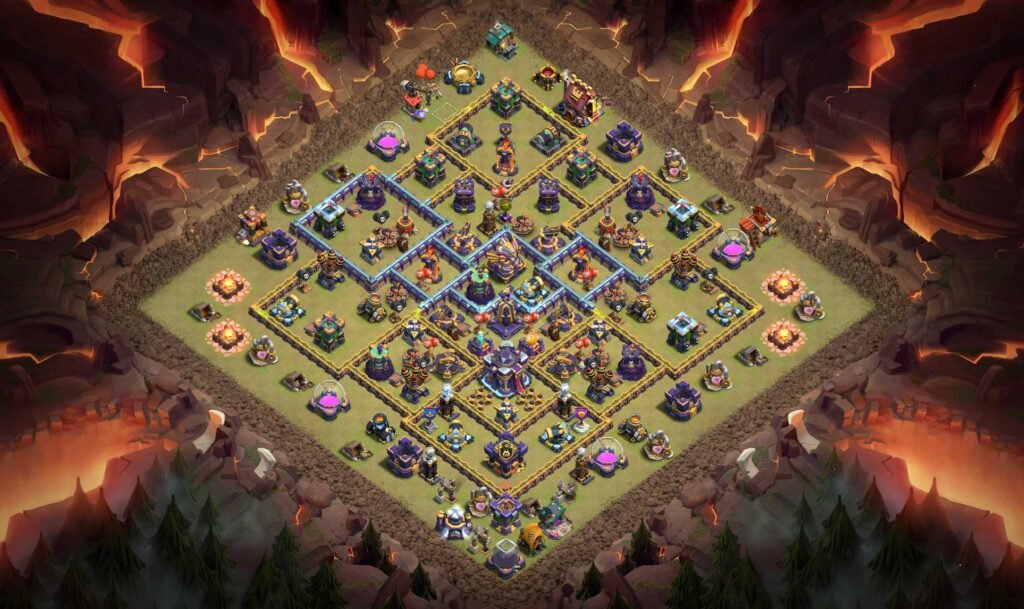
Building the Perfect TH15 War Base Layout
Let’s break down how to build your TH15 war base with the Eagle Artillery at the center, ensuring both protection and strategic efficiency.
Step 1: Core Setup
Your core zone is the heart of your base. It should contain:
- Eagle Artillery (center-most structure)
- Monolith (adjacent or slightly offset)
- Clan Castle (close to core, not lureable)
- Town Hall (depending on your war design, some prefer off-center to avoid double value)
This creates a deadly triangle of defense, where attackers must wade through traps, high DPS defenses, and spell tower effects before reaching key objectives.
Step 2: Compartmentalization
Walls are not just barriers; they’re tactical dividers. Use multi-layer compartments to:
- Slow down ground troops (especially Electro Titans and Bowlers).
- Force pathing confusion for Queen Charges.
- Protect against Flame Flinger or Siege Barracks funneling.
Example:
“One of the most effective TH15 war bases I’ve tested used 12 distinct compartments. It took attackers nearly 2 minutes just to reach the Eagle Artillery by then, most of their army was gone.”
Step 3: Defensive Synergy
Make your defenses work together:
- Pair Spell Towers with Inferno Towers or Monolith.
- Place X-Bows on ground mode covering the core zone.
- Use Scattershots on opposite sides for splash coverage.
- Keep Air Defenses near the middle, not all at the edges.
When every defense covers another’s weakness, you create a balanced base that’s hard to dismantle.
Trap Placement Strategy for TH15 War Base
Traps can make or break your defense. Smart trap placement turns a good base into a great one.
Air Traps
- Seeking Air Mines near Scattershots or Monolith.
- Air Bombs around the Eagle’s range to eliminate Healers.
- Always rotate trap placements weekly attackers often memorize layouts.
Ground Traps
- Giant Bombs near Hero paths (especially Archer Queen).
- Spring Traps in choke points between compartments.
- Skeleton Traps set to air to counter Dragons or Electro Titans.
Tornado Trap
The ultimate stall tool. Place it between the Town Hall and Eagle Artillery this delays Blimps or Battle Blimps long enough for Scattershots and Monolith to strike.
Defending Against Popular Attack Strategies
At TH15, wars are brutal. Here’s how a TH15 war base with a central Eagle Artillery holds up against top meta attacks:
1. Electro Titan Smash
- Titans rely on steady progression and Pathing.
- Your goal: disrupt their pathing.
- Multi-compartment walls delay their movement.
- Central Eagle + Rage Spell Tower annihilates them mid-core.
- Use Tesla Farm to lure Titans off course.
2. Queen Charge Hybrid
- Place Air Defenses deep within the base.
- Use multi-target Infernos near the charge entry to fry Healers.
- A Poison Spell Tower near Eagle Artillery punishes Queen Walks heavily.
3. LavaLoon Attacks
- Centered Eagle ensures constant air coverage.
- Spread Air Sweepers diagonally to push Balloons into danger zones.
- Traps near the core pop Hounds early, causing Balloon collapse.
4. Zap Titans / Super Archers
- Scatter defenses so spells can’t take multiple targets.
- Keep Eagle far from Monolith to prevent double zap value.
- Use Invisibility Spell Tower near Town Hall to waste their spell timing.
Hero Placement Strategy
Heroes can make a massive difference when placed strategically.
- Archer Queen: Near the Eagle or behind compartments where she can reach air troops.
- Barbarian King: Outside or near funneling paths to stall enemy heroes.
- Royal Champion: Positioned to sweep up outer defenses, synergizing with Scattershots.
- Grand Warden: Usually on air mode, covering key splash zones.
Together, they act as a second line of defense unpredictable and punishing.
FAQ
How can I make my TH15 war base anti-3 star?
Focus on pathing disruption use compartments, dead zones, and misleading trap setups. Keep the Eagle and Monolith deep to punish late-game troop clusters.
Which heroes should defend near the Eagle Artillery?
Place your Archer Queen and Minion Prince near or behind the Eagle. Their range and speed help neutralize air troops before they can destroy the core.
What’s the best place to put Eagle Artillery in a TH15 war base?
The best placement is dead center or slightly offset within a core compartment. This ensures maximum coverage and makes it nearly impossible for attackers to reach it early.
Conclusion
Designing a powerful TH15 war base is part art, part science. The central Eagle Artillery setup isn’t just about protection, it’s about control. You’re dictating how attackers move, where they struggle, and when they fall apart.
Feel free to copy this base design into your game,
So, whether you’re defending your clan’s streak or competing in CWL, remember:
- Keep the Eagle alive as long as possible.
- Build synergy between defenses.
- Adapt constantly to the evolving meta.
Master these principles, and your TH15 war base won’t just defend it’ll dominate.