As Builder Hall 7 base battles become more competitive than ever, defending your trophies has turned into a true test of skill. Players are no longer spamming troops blindly; every attacker is looking for weaknesses to exploit. That’s why having a strong and adaptable base design is critical. At BH7, one slip in your base layout could mean the difference between a one-star defense and giving away a crushing three-star.
In this guide, we’ll break down two meticulously crafted Builder Hall 7 base designs, built to counter both ground and air assaults. Each one is divided into two stages: the first focuses on luring and weakening attackers, while the second forms an impregnable core that punishes them for pushing deeper. Along the way, you’ll also learn practical upgrade priorities, trap placement strategies, and attack-countering tips so you can make the most of your defenses.
Table of Contents
Why Builder Hall 7 Base Design Matters
BH7 is a unique milestone in Clash of Clans’ Builder Base. Here’s why your design choices matter more than ever:
- New Defenses Open Up: At BH7, you unlock powerful structures like the Giant Cannon. This monster deals heavy damage to tanks, especially the Battle Machine and Boxer Giants.
- Air vs. Ground Balance: Attackers at this level bring more versatile armies. You’ll face Baby Dragon spam one match and then mass Night Witches the next.
- Larger Armies, More Camps: Offense scales dramatically, meaning your layout needs to anticipate larger troop combinations.
- Trophy Pushing Gets Real: BH7 is where many players stall out around 3,000+ trophies. A weak base here can tank your progress.
That’s why base design isn’t just about looking neat; it’s about building layered defenses that punish every type of attacker.
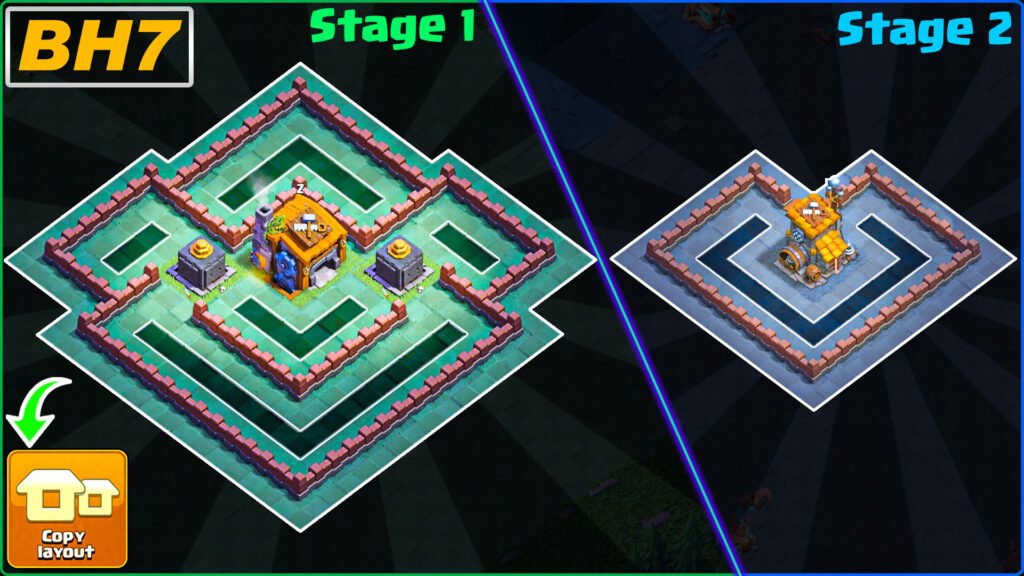
Stage 1: The Foundation of Your Builder Hall 7 Base
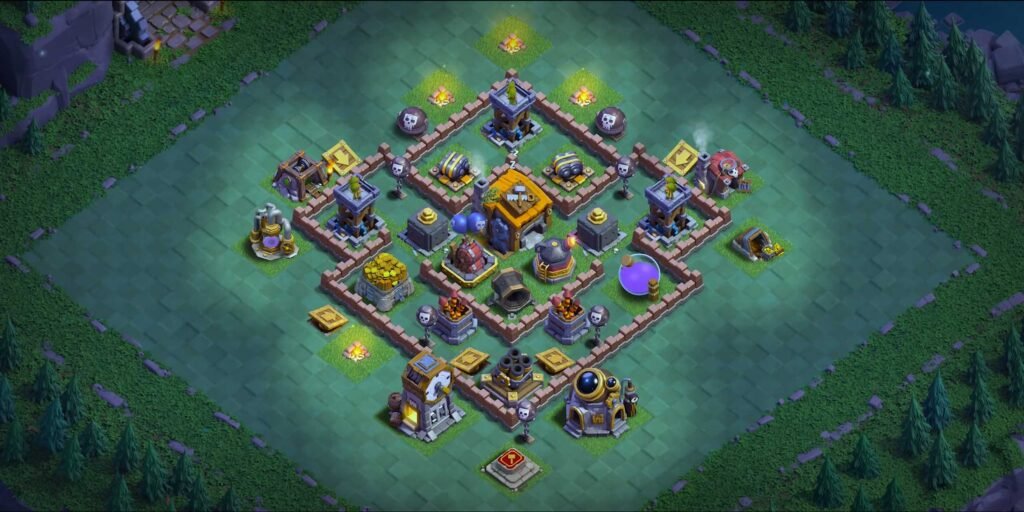
The first stage of our base design focuses on creating a strong foundation that channels enemy troops through carefully planned kill zones. At this stage, the goal isn’t necessarily to stop the attack outright, but to soften up the enemy so they’re ill-prepared for the brutal second stage.
Key Defensive Features
- Roaster in the Core: This building is your MVP against swarms of Minions and Night Witch bats. Place it so it covers the largest portion of your base.
- Archer Towers in Guard Mode: With their long reach and consistent DPS, Archer Towers shred lighter troops before they even touch your walls.
- Air Bomb Centralization: Since air spam is popular at BH7, place your Air Bomb deep enough that attackers can’t snipe it with Sneaky Archers.
- Double Cannon Coverage: This weapon excels at melting Boxer Giants and the Battle Machine. Place it so it covers high-traffic entry points.
Compartmentalization is King
The magic of Stage 1 lies in compartmentalization. Instead of leaving your defenses exposed in an open base, divide them with walls into mini-sections. This forces ground troops like Boxer Giants to break through multiple layers, all while taking fire from Double Cannons, Crushers, and Archer Towers.
Trap Placement Tricks
- Spring Traps near Crushers: Giants funnel straight into them.
- Push Traps aimed at the Giant Cannon: Force tanks into its devastating fire.
- Mines set to Air near Firecrackers: Surprise Beta Minions mid-flight.
These tricks alone can swing a 2-star attack into a frustrating 1-star for your opponent.
Stage 2: The Impenetrable Core
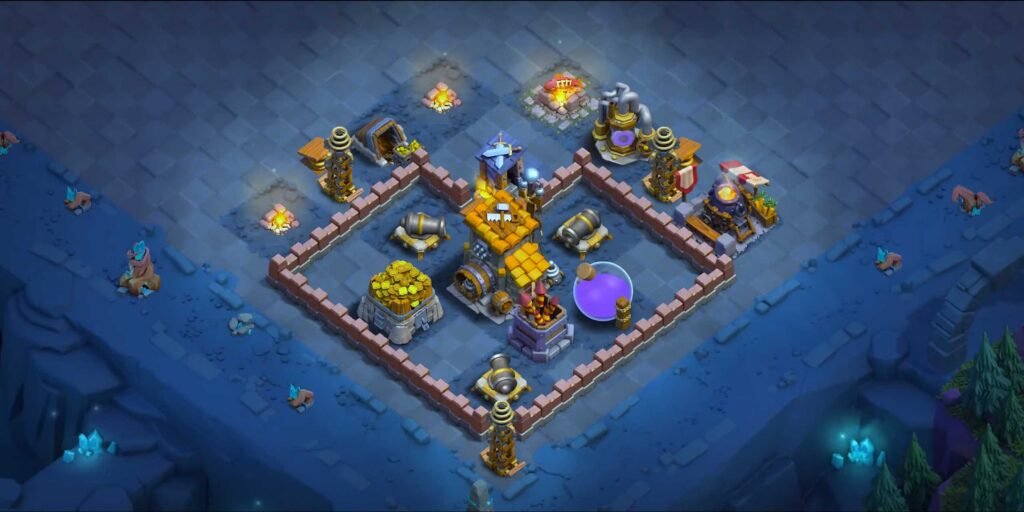
Once attackers break through the first stage, they face Stage 2: an impregnable fortress designed to stop them dead in their tracks.
The Heart of the Stage 2
At this stage, the O.T.T.O’s Outpost becomes bait and protection simultaneously. Place it at the center, surrounded by:
- Giant Cannon – One of the scariest defenses at BH7, capable of two-shotting the Battle Machine.
- Crusher(s) – Placed on either side of the Giant Cannon to punish ground troops.
- Air Bombs + Firecrackers – Positioned to cover each other and protect the Builder Hall from Baby Dragons and Minions.
- Hidden Teslas – Deceptively strong when placed near the core to surprise tanks or clean up low-HP troops.
Trap Integration in the Core
This is where things get nasty for attackers:
- Extra Spring Traps in Front of Core Crushers – Punish Giants that survive the outer layer.
- Mega Mine Next to Builder Hall – Perfect against mass Night Witch pushes.
- Push Traps into Dead Zones – Redirect troops away from the Builder Hall and into stacked defenses.
The brilliance of Stage 2 is psychological as well as physical. By the time attackers reach the core, they’ve already lost much of their army to Stage 1. Now, even if they push through, the traps and core defenses grind them into dust.
Why These Builder Hall 7 Base Designs Work
Both stages are designed with adaptability in mind. Whether your opponent comes with ground-heavy compositions or air-heavy spam, these bases make life miserable for them.
- Against Ground Armies: Crushers, Giant Cannon, and smart Spring Trap placement shred tanks.
- Against Air Armies: Roaster, Firecrackers, and Air Bomb ensure Baby Dragons and Minions never get far.
- Against Hybrids: Compartmentalization forces awkward pathing, causing troops to split and lose synergy.
Simply put: these bases thrive because they punish predictable attack strategies and force mistakes.
Upgrade Priorities for BH7 Defense
Even the best layout won’t save you if your defenses are under leveled. Here’s a recommended priority list:
- Giant Cannon – Max this first; it’s your biggest damage dealer.
- Roaster – Essential against Night Witches and Minions.
- Air Bombs – Crucial for anti-air.
- Crushers – Needed for anti-ground.
- Firecrackers – Backup air coverage.
- Double Cannons + Archer Towers – Round out the rest.
- Walls – Upgrade gradually but don’t prioritize over defenses.
Common Mistakes to Avoid at Builder Hall 7
- Centering All Traps Together: Spread them out for maximum surprise value.
- Leaving Roaster Exposed: Air attackers will snipe it early. Keep it protected.
- Over-relying on One Base Style: Rotate between designs to keep opponents guessing.
- Underestimating Air Spam: Most BH7 attackers lean on air; always upgrade air defenses first.
FAQ
How do I stop Baby Dragon spam at BH7?
Protect your Roaster, spread Firecrackers, and place Air Bombs deep inside your base. Add Air Mines near likely Baby Dragon entry points.
Are Night Witches still good at Builder Hall 7?
Yes, but they’re easier to counter with a strong Roaster and well-placed Mega Mine. Good layouts force their bats into overlapping defenses.
Should I rush to Builder Hall 8 instead of maxing 7?
It depends. If you’re trophy-pushing, maxing BH7 first gives you stronger defenses. If you’re more casual, rushing can unlock new strategies faster.
How do I defend against high-level Battle Machines?
The Giant Cannon is your best friend. Place it where the Battle Machine is forced to walk through. Crushers and Spring Traps around it help seal the deal.
Conclusion
The Builder Hall 7 base isn’t just about piling defenses randomly; it’s about strategy, psychology, and adaptability. The two-stage base designs outlined here force attackers into tough choices: risk losing half their army in Stage 1, or push through only to meet an even deadlier Stage 2.
Feel free to copy this base design into your game,
Whether your opponent attacks from the air with Baby Dragons or storms the ground with Giants and Night Witches, these designs ensure you’ve got the upper hand. Upgrade wisely, rotate layouts to stay unpredictable, and keep watching defense replays to refine your trap placement.
At the end of the day, the Builder Base is a chess match. And with a strong Builder Hall 7 base, you’ll always be two moves ahead. So, are you ready to unleash your new defenses and watch frustrated attackers walk away with 1-star results? If so, it’s time to put these designs into action and dominate your BH7 battles like never before.