Are you tired of seeing your hard-earned trophies vanish in a single attack at Builder Hall 10? If so, you’re not alone. At this stage of Clash of Clans, battles get fiercer, attackers become more strategic, and a weak layout can leave your Builder Hall 10 base vulnerable. The good news? With the right design and strategic thinking, you can turn the tide and make your base a nightmare for every attacker.
In this guide, we’ll walk through two expertly designed Builder Hall 10 base layouts, organized in two stages: the first stage softens the enemy and funnels troops into deadly zones, while the second stage protects your core and punishes any intruder daring to reach it. These layouts are optimized for both ground and air attacks and have been tested in real battle scenarios, so you can confidently defend your trophies and climb the ranks.
Table of Contents
Why a Strong Builder Hall 10 Base Matters
Builder Hall 10 is a turning point in the Builder Base. Here’s why investing in a strategic layout is essential:
- New Defensive Options: At BH10, you unlock the Mega Tesla, Multi Mortar, and Crusher upgrades that significantly increase your defensive potential.
- Bigger Armies: Opponents now deploy larger, more versatile armies, meaning your base needs to counter multiple attack strategies simultaneously.
- High-Stakes Trophy Battles: At this level, even a small mistake in layout or trap placement can cost multiple stars and trophies.
- Advanced Pathing Needs: Proper compartmentalization can manipulate enemy troop movement, forcing them into traps and concentrated fire.
A well-designed Builder Hall 10 base isn’t just a collection of strong defenses; it’s a carefully choreographed battlefield where every building, wall, and trap works together to crush attackers.
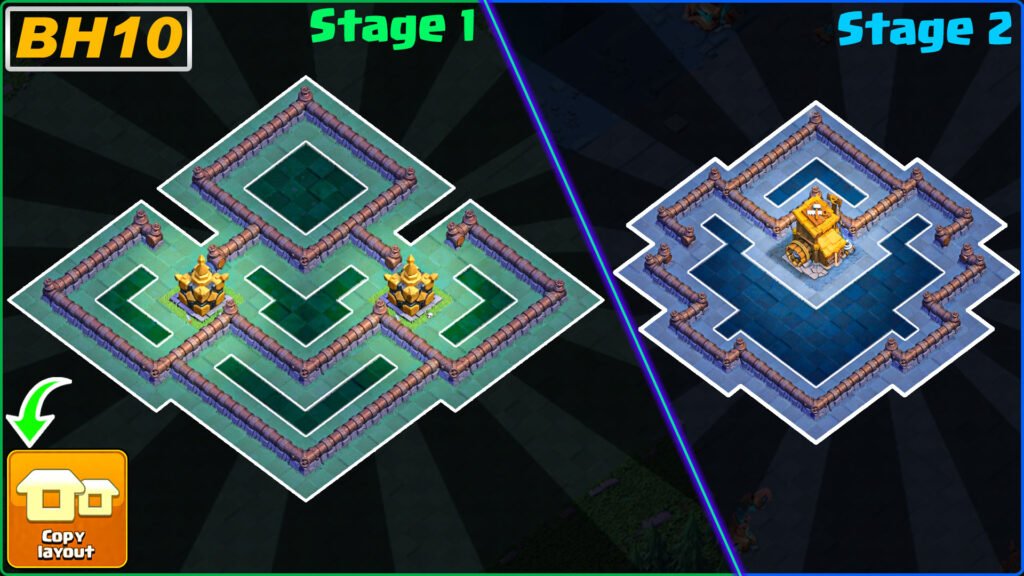
Stage 1

Stage 1 of our Builder Hall 10 base focuses on creating a strong outer layer that weakens enemy troops while protecting your core. At this stage, the goal is to slow, split, and damage the attacking forces before they reach the central defenses.
Key Defensive Buildings
- Roaster: Central to countering mass air attacks. Its continuous fire damages swarms of Minions, Baby Dragons, and even Night Witches’ bats.
- Multi Mortar: Excellent for clearing groups of ground troops, forcing attackers to reconsider tank-heavy strategies.
- Double Cannons: Perfect for high-damage bursts against single-target units like Boxer Giants and Battle Machines.
- Mega Tesla: A late-game powerhouse that punishes concentrated enemy troops, especially when they cluster near your core.
Smart Compartmentalization
One of the strongest aspects of this stage is intelligent compartmentalization. Walls are used not just to protect buildings, but to guide attackers through specific paths, funneling them into high-damage areas. This ensures that troops face multiple layers of fire before they can even think about reaching your Builder Hall.
- Outer Walls: Direct attackers toward Crushers and Spring Traps.
- Inner Compartments: Force air troops into overlapping Roaster and Air Bomb coverage.
- Funnel Points: Guide troops into concentrated fire zones for maximum efficiency.
Trap Placement
Traps at Stage 1 are designed to inflict early damage and disrupt the attacker’s rhythm:
- Spring Traps near Crushers: Eliminates high-HP ground units quickly.
- Push Traps near Double Cannons: Redirects troops into kill zones or funneling paths.
- Mines near Multi Mortar and Roaster: Weakens ground or air swarms before they hit critical defenses.
Stage 2

Stage 2 represents the heart of your Builder Hall 10 base, where the remaining main defensive buildings create an almost impenetrable fortress. Even if an attacker survives Stage 1, Stage 2 punishes them severely.
Core Defensive Layout
- O.T.T.O’s Outpost at the Center: Protects your trophies and forms the focus of all defensive coverage.
- Mega Tesla and Crushers: Positioned to cover every entry point into the core, punishing ground troops.
- Multi Mortars: Provides splash damage for lingering troops.
- Air Bombs and Firecrackers: Cover all aerial approaches to the Builder Hall.
- Hidden Teslas: Deployed in high-traffic areas to surprise tanks or high-HP troops.
Trap Integration in Stage 2
Stage 2 traps are designed to break even the most careful attacks:
- Spring Traps in Front of Core Crushers: Eliminates Giants or Battle Machines that survive Stage 1.
- Mega Mines near Builder Hall: Crush mass Night Witch or Minion pushes.
- Push Traps: Force troops into concentrated fire zones or away from the Builder Hall.
Pro Tip: Place traps in unpredictable locations. Even experienced attackers can be thrown off if they can’t anticipate the exact layout.
The Psychological Advantage
Beyond raw damage, Stage 2 also creates psychological pressure. By the time the enemy reaches the core, their army is already reduced and disorganized. This makes them hesitant, leading to mis-deployment or wasted troop abilities, giving your defenses the upper hand.
Why These Builder Hall 10 Base Designs Work
These two-stage designs are not just visually appealing; they are battle-tested and highly adaptable:
- Ground Attack Defense: Crushers, Multi Mortars, and Spring Traps decimate Giants, Boxer Giants, and Battle Machines.
- Air Attack Defense: Roaster, Firecrackers, and Air Bombs handle Baby Dragons, Minions, and Night Witch bats efficiently.
- Hybrid Attack Counter: Compartmentalization forces troop splitting and inefficient pathing, weakening the overall assault.
When combined, the stages create a layered defense system that punishes attackers at every step, leaving your Builder Hall 10 base virtually unbreachable if built and upgraded correctly.
Upgrade Priorities for BH10 Defense
Even the most strategic layout won’t work without properly leveled defenses. At Builder Hall 10, here’s what you should prioritize:
- Mega Tesla: Maximum damage output for core defense.
- Roaster: Essential for air troop countering.
- Multi Mortar: Provides consistent splash damage.
- Crushers: Critical for stopping ground pushes.
- Air Bombs: Prevents Baby Dragon and Minion spam.
- Double Cannons and Firecrackers: Support main defenses.
- Walls: Upgrade gradually, focusing on high-traffic areas first.
Common Mistakes to Avoid
- Clustering All Traps: Spread them for maximum disruption.
- Exposing Key Defenses: Never let your Roaster or Mega Tesla be easily sniped.
- Ignoring Air Defense: Many BH10 attackers rely heavily on air troops.
- Neglecting Replay Analysis: Study attack replays to identify weaknesses in your two-stage layout.
FAQ
How do I defend against Baby Dragon spam at BH10?
Use Roasters, Firecrackers, and Air Bombs strategically. Compartmentalization also forces Baby Dragons into overlapping defense zones for maximum damage.
Should I focus on ground or air defense first?
Both are important, but a slight priority on air defenses like Roasters and Air Bombs can prevent quick three-star losses from Baby Dragon attacks.
Is it better to max defenses or walls first at BH10?
Defenses should always take priority. Walls are important, but they’re only effective if your buildings and traps are strong enough to punish attackers.
Conclusion
The Builder Hall 10 base is more than just a collection of defenses; it’s a battlefield strategy. With the two-stage layout, attackers are funneled, trapped, and punished at every step. By combining smart compartmentalization, trap placement, and a focus on key defensive upgrades, you can defend your trophies and climb the ranks confidently.
Feel free to copy this base layout into your game,
Remember, Clash of Clans is as much about outthinking your opponent as outpowering them. With these designs, you’ll be prepared for every type of attack; ground, air, or hybrid, and make every raid a frustrating experience for your opponents. So go ahead, implement these two-stage Builder Hall 10 base layouts, watch your replays, tweak as necessary, and dominate your Builder Base battles like a pro!